Raspberry Flavored Time (A NTP server on your Pi, tethered to a GPS unit)
2014/11/12: This article’s is in the process of being revisited. Please keep in mind that it is very old before using its instructions and resources.
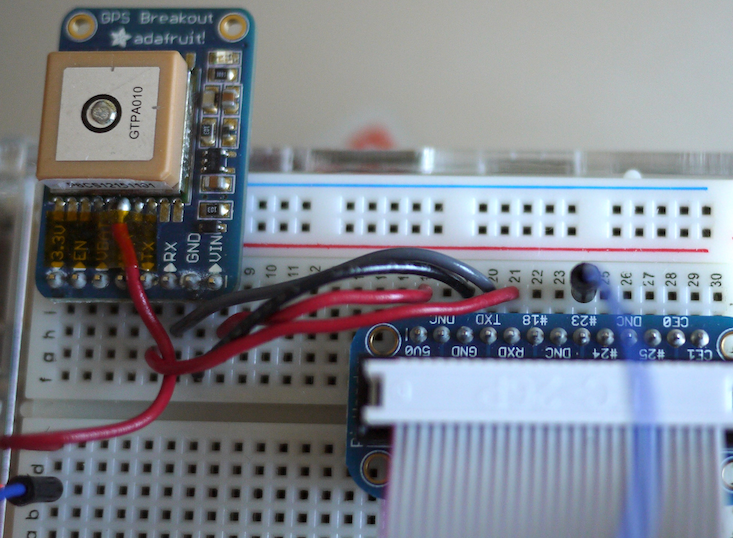
GPS module connected to a Raspberry Pi (for accurate time keeping):

A primer on time
Watch this brief video by Bill Hammack, aka engineerguy on YouTube. It covers the complexities of keeping very accurate time in a short video!
Where NTP fits in
Being on synchronized time is pretty important. Is your office clock faster or slower than the one on your watch? What about your phone? What if you turn it off for a month? A year?
In other to get time from very accurate sources, some devices and services use the Network Time Protocol (NTP for short) to keep their time synchronized. Your device is probably using NTP as you read this!
How it works: Periodically, your computer will connect to servers that speak NTP. After getting the time, your system does some math (to account for transmission delays, and bad clocks), and adjusts the system clock. This periodic synchronization keeps a clock from drifting too far behind, or too far ahead from the world standard.
By itself though, NTP does not provide accurate time information. This the job of a dedicated reference clock.
A reference clock is a precise source of time, and these are connected to a computer which transmit their data over a network using NTP.
In our case, we can (ab)use a GPS unit as a reference device (in GPS, accurate positioning requires very accurate time). While not a lab quality reference clock, it has enough accuracy for most applications.
Strata
In NTP parlance, time systems are arranged into different strata. Each level (starting from zero), determines how far away you are from a clock source. [1]
Stratum 0: Cesium/Rubidium-based clocks, radio and GPS clocks. Depending on precision, these can be very, very, very accurate (and really expensive too)!
Stratum 1: Computers attached to Stratum 0 sources. They expose the data from Stratum 0 to the world.
Stratum 2: Collector of stratum 1 time over a network. May punt bad stratum 1 clocks (e.g. stop listening to them).
Stratum N: N level away from 0, does the same as 2.
Stratum 16: Considered to be unsynchronized.
Most consumers of NTP data collect information from stratum 2 (or higher) sources.
For instance, Apple’s time.apple.com server is a stratum 2 time source. It might be connected to a bunch of stratum 1 time sources. In turn, the stratum 1 computers would be connected to a gaggle of stratum 0 reference clocks.
Being a stratum 2 source, it figures out which stratum 1 time source(s) it can trust and aggregates all the data between those. Using a bit of math, it figures out which sources seem bad, and kicks those results to the curb.
% ntpq -p
     remote           refid      st
====================================
*time.apple.com  17.168.198.148   2
GPS Clock-o-Bot
That brings us to setting up our own GPS-sourced clock. Why?
Perhaps you are stuck on a remote island without a reliable Internet connection.
You have some sort of experiment that needs to have great timing.
You’re going to use the GPS hookup for something else entirely (like a phone home device), and want the meat on how to do that. (Sure!)
You feel like abusing a NTP server for some reason, or policy prevents you from getting accurate time through the Internet.
Having your own time server is cool.
Say this in an Australian accent, or with an accent that features a high rising terminal so it sounds more awesome: “Why the heck not!”
Difficulties
Beyond this point, this becomes a slightly advanced article. You’ll most likely be comfortable with a bit of prior Raspberry Pi/Linux/Electronics experience under your belt.
I try to explain steps throughly, and provide links to external sources which should help even if you are a beginner.
Parts List
All of these parts are available from one vendor, so you don’t have to order and coordinate shipping times. The vendor used here is Adafruit. They’re well regarded with very reasonable policies and good people.
Raspberry Pi - The brains of the project! Raspberry Pis sell out fast, so buying from another vendor may be the only possible way of acquiring one.
Adafruit Ultimate GPS Breakout, v3 a very compact GPS unit with 1PPS output. (Note: If you have a v1 or v2, you can still get a 1PPS signal – you’ll need to solder a small wire to the exposed pad. See the PDF documentation for a pinout.)
Hardware voltage warning: If you are using another GPS, please mind the GPIO pin voltages as they are only 3.3v tolerant. There is no over-voltage protection on the board. This means a bad connection could easily kill a pin or worse.
Wires - If you will be using the Pi Cobbler below along with a standard breadboard, the wires should just be solid core wire. If you will be wiring the GPS up directly (using the provided header), they should probably be Female/Female jumpers.
Ethernet Cable - Or wireless adapter to connect. Definitely check old router boxes for this.
SD Card - For loading a distribution. You probably have one of these already lying around.
Power Adapter - The power adapter should terminate to a micro USB cable (these are the slimmer “phone charger” cables). Be sure to look for an adapter with a current rating of around 850mA (or more).
Optional
Raspberry Pi Cobbler - This makes identifying the proper pins a piece of.. cake (pun intended).
Raspberry Pi Box - A simple enclosure that can have the breadboard stacked on top of it.
Breadboard - For use with the cobbler.
Distribution
Starting from scratch, you will need Occidentalis, a fork of Raspbian.
Download by following a few links here.
After downloading, write the image to the SD card.
If you have forgotten how to write images (it happens even to the best of us), try this guide on elinux.org.
Initial Setup
After flashing your SD card, insert the card and boot the Raspberry Pi by plugging it in.
Edit /boot/cmdline.txt, along with /etc/inittab to free up the UART (which shows up on /dev/ttyAMA0) so that the NMEA “serial” data can be read on the Pi.
$ sudo nano /boot/cmdline.txt

# Remove these in cmdline.txt:
# `console=ttyAMA0,115200`
# and `kgdboc=ttyAMA0,115200`.
# Mine looks like this:

dwc_otg.lpm_enable=0 console=tty1 root=/dev/mmcblk0p2 rootfstype=ext4 elevator=deadline rootwait
Hold CTRL+o and hit [Enter] to save. Then hold CTRL+x to exit.
Next, edit /etc/inittab and comment out, or remove the last line in this file (page down till you see it):
$ sudo nano /etc/inittab
#Spawn a getty on Raspberry Pi serial line
#T0:23:respawn:/sbin/getty -L ttyAMA0 115200 vt100
Once you are done, power off the Pi and begin connecting things to it!
$ sudo poweroff

# Remove the power connector when only the PWR LED remains lit/screen
# goes blank and begin attaching things.
Connect the following pins (Raspberry Pi is on the right, GPS on the left):
Here is a really boring pin out diagram:
GPS     RPI
---     ---
RX  --> TXD
TX  --> RXD
PPS --> GPIO #23
GND --> GND
VIN --> 5V0
Wiring for the Adafruit Ultimate GPS v3 (RX->TXD isn’t connected):
For the v2, with a wire soldered onto the 1PPS pad (the 1PPS wire goes to the blue one off image, which then leads to GPIO #23):
If you need background on where GPIO pin 23 is located when connecting directly, see this page at elinux.org. Otherwise, GPIO #23 is just #23 if you’re using the Pi Cobbler.
Once everything is connected and you’ve verified everything twice, connect the power.
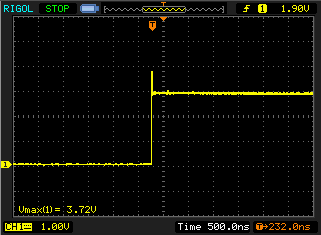
1PPS
You may be wondering about the PPS pin!
While NMEA data is good enough for synchronizing time to within a few hundred milliseconds, it can be bad for applications that require precision timing, or just plain bad if you’re obsessed with getting precise time.
This is where the PPS pin we connected earlier comes into play. 1PPS or One Pulse Per Second, is a signal that says “here is the precise start of a second!” A PPS signal is usually accurate to a few nanoseconds give or take whatever is in the path between sender and receiver.
Alone, 1PPS can only tell you the precise start of a second, so anything that wants to set time accurately needs both NMEA data and 1PPS information.
To effectively utilize 1PPS, we’ll have to patch the kernel and add support.
Switching The Kernel
Doing this isn’t particularly hard. However, keep in mind that it will overwrite any special modifications you’ve already done to the kernel, and will break on upgrades to the kernel.
In order to keep things simple, I have a repository with pre-made kernel modules and kernel image. If you’d like to view the source this is based on, click here. [2]
To grab the pre-compiled kernel and modules:
$ sudo apt-get install git
$ git clone https://github.com/davidk/adafruit-raspberrypi-linux-pps.git
Back up and copy the kernel image:
$ cd adafruit-raspberrypi-linux-pps
$ sudo mv /boot/kernel.img /boot/kernel.img.orig
$ sudo cp kernel.img /boot
Move the modules over:
$ sudo mv modules/* /lib/modules
Finally, add the pps-gpio module to /etc/modules.
# Run this command in a sub-shell so appending works
$ sudo sh -c "echo 'pps-gpio' >> /etc/modules"
Automatically Making Links In /etc/udev
By default, our setup isn’t usable by the NTP server since it expects data to be present at specific locations. By adding a few rules to udev, we can automatically make symbolic links (aliases, shortcuts, etc) from our NMEA serial and 1PPS data, to a place where NTP can read and interpret it.
If we didn’t create these rules, the NTP driver would get no data to process.
$ sudo nano /etc/udev/rules.d/80-gps-to-ntp.rules
# Change MODE of ttyAMA0 so it is readable by NTP and provide a symlink to
# /dev/gps0
KERNEL=="ttyAMA0", SUBSYSTEM=="tty", DRIVER=="", SYMLINK+="gps0", MODE="0666"
# Symlink /dev/pps0 to /dev/gpspps0
KERNEL=="pps0", SUBSYSTEM=="pps", DRIVER=="", SYMLINK+="gpspps0", MODE="0666"
Hold CTRL+o to write the file, tap [Enter] and then hold CTRL+x to exit.
Installing and Configuring NTP
To install NTP, we abuse the default install a bit since the repository version doesn’t really pick up on 1PPS. It will also take some time to do all of this since we’re compiling from scratch.
$ sudo apt-get install ntp
$ sudo apt-get remove ntp
$ sudo apt-get update
$ sudo apt-get install libcap-dev
$ sudo apt-get install pps-tools
$ wget http://www.eecis.udel.edu/~ntp/ntp_spool/ntp4/ntp-dev/ntp-dev-4.2.7p319.tar.gz
$ tar -xvf ntp-dev-4.2.7p319.tar.gz
$ cd ntp-dev-4.2.7p319

$ ./configure --prefix=/usr --enable-all-clocks --enable-parse-clocks \
--enable-SHM --enable-debugging --sysconfdir=/var/lib/ntp --with-sntp=no \
--with-lineeditlibs=edit --without-ntpsnmpd --disable-local-libopts \
--disable-dependency-tracking && make
$ sudo make install
Be sure to edit /etc/init.d/ntp and change the DAEMON line:
$ sudo nano /etc/init.d/ntp
DAEMON=/usr/bin/ntpd
#DAEMON=/usr/sbin/ntpd
Once you have been dropped back to the terminal, edit /etc/ntp.conf and add the following (be sure to change the broadcast line if it differs for you):
$ sudo nano /etc/ntp.conf

# http://www.eecis.udel.edu/~mills/ntp/html/drivers/driver20.html explains
# these settings
# Slightly modified, but credit to:
# Paul Kennedy @ (http://www.raspberrypi.org/phpBB3/viewtopic.
#	php?f=41&t=1970&start=80)
server 127.127.20.0 mode 17 minpoll 3 iburst true prefer
fudge 127.127.20.0 flag1 1 time2 0.496
For a general setup with an Internet connected Pi, leaving these uncommented is generally considered good practice.
server 0.debian.pool.ntp.org iburst
server 1.debian.pool.ntp.org iburst
server 2.debian.pool.ntp.org iburst
server 3.debian.pool.ntp.org iburst
What do the bits in the server line do? [3]
server 127.127.20.0 mode 17 minpoll 3 iburst true prefer
127.127.20.0: Specify the GPS_NMEA driver.mode 17: This sets the line speed (bit 4, dec: 16) to 9600 bps. Additionally, $GPRMC is processed (bit 0, dec: 1). We get a total sum of 17 when adding the decimal parts together (hence “mode 17”).minpoll: Minimum polling interval for NTP messages in a power of 2. Here, 3 = 8 seconds.iburst: If a server is unreachable, send a burst of eight packets instead of one.true: Let the server survive NTP’s algorithmic weeding.prefer: If we have a choice among good hosts (post-determination, etc), use this one for syncing.
fudge 127.127.20.0 flag1 1 time2 0.496
The fudge options are driver dependent. [4]
127.127.20.0: Specify the GPS_NMEA driver.flag1 1: Activate PPSAPI, and process the PPS signals we get.time2: Compensate slightly for transmission delays. Instructions for tuning this are located on the driver home page. Specifically, look for 7 (bit) / 128 (decimal) in the mode section.
A complete explanation of the flags used is provided at the website above. You can also just click here to be taken there as well.
Reboot
Now that the kernel is updated, udev makes links properly, and NTP is installed+configured.. all that is left to do is pray to your local noodly appendage (or other $x of choice) and reboot.
$ sudo reboot
Checking the time
Once you’re back up, wait for your GPS to lock (give it a view of the sky to make this process faster).
When your GPS is locked to a sufficient number of satellites (the Adafruit GPS module will blink intermittently), type ntpq -p into your Raspberry Pi’s console, and you’ll get something like this:
$ ntpq -p
     remote           refid      st t when poll reach   delay   offset  jitter
==============================================================================
oGPS_NMEA(0)     .GPS.            0 l    8    8  377    0.000   -0.025   0.002
Unit Calibration (skip if not using Adafruit’s GPS module)
To get the best out of the Adafruit GPS unit, we will tune it so that it outputs only the sentences we need. In particular, we’re interested only in the $GPRMC lines.
Before continuing, ensure that the RX (GPS) to TXD (Raspberry Pi) line is connected. Add an extra wire if it isn’t.
Note that these changes are not permanent; they will be lost during a power cycle (install a battery to prevent this from happening), or reverted using another command. [5]
$ echo -e '$PMTK314,0,1,0,0,0,0,0,0,0,0,0,0,0,0,0,0,0,0,0*29\r\n' > /dev/ttyAMA0
This command squelches all of the other NMEA sentences and only outputs $GPRMC, making everything tick a little more efficiently. To verify that the proper sentences are being output, run:
# Tap CTRL+C to exit
$ cat /dev/ttyAMA0
$PGTOP ....
$GPRMC ....
In certain cases, it may take several tries in order to get the unit to recognize the command properly.
If you’re interested in playing around with the outputs, check out this PDF, and use this checksum calculator to get the value at the end (this means that if we change the line above, the *29 value changes when the command changes.. so we would need to calculate a new checksum!).
Lights!
On a system with ntpdate (a Linux or OS X system usually has this utility), we can query the Raspberry Pi to get and/or set the time.
$ ntpdate -vdq 192.168.1.101
24 Dec 04:13:42 ntpdate[8390]: ntpdate 4.2.6p5@1.2349-o Fri Apr 27 08:36:47 UTC 2012 (1)
Looking for host 192.168.1.101 and service ntp
host found : 192.168.1.101
transmit(192.168.1.101)
receive(192.168.1.101)
transmit(192.168.1.101)
receive(192.168.1.101)
transmit(192.168.1.101)
receive(192.168.1.101)
transmit(192.168.1.101)
receive(192.168.1.101)
server 192.168.1.101, port 123
stratum 1, precision -19, leap 00, trust 000
refid [GPS], delay 0.02612, dispersion 0.00000
transmitted 4, in filter 4
reference time:    d482c575.72b3b105  Mon, Dec 24 2012  4:13:41.448
originate timestamp: d482c57c.9e9ef4c5  Mon, Dec 24 2012  4:13:48.619
transmit timestamp:  d482c57c.9d24334c  Mon, Dec 24 2012  4:13:48.613
filter delay:  0.02621  0.02617  0.02612  0.02620
         0.00000  0.00000  0.00000  0.00000
filter offset: 0.005206 0.005221 0.005233 0.005197
         0.000000 0.000000 0.000000 0.000000
delay 0.02612, dispersion 0.00000
offset 0.005233

24 Dec 04:13:48 ntpdate[8390]: adjust time server 192.168.1.101 offset 0.005233 sec
If the last line says “Server dropped: Leap not in sync” – it may take some time for trust in the time to be established. This tends to be on the order of minutes; if it happens, wait around 26 to 30 minutes and try again.
Integration
Ideally, this itself would be automated somehow. Each system has a time setting that allows you to set the time sync source.
OS X
Click the time at the top right, and click Date & Time Preferences. Type in your Raspberry Pi’s address next to “Set date and time automatically.”
Linux
If using a desktop, this tends to be handled in a GUI menu. If not, check to see if you have, or can install a NTP daemon. Then edit ntp.conf (usually located in the /etc/ directory) and set the server stanza as appropriate.
Windows
Windows users can also right click the time, click the Adjust Date/Time option, click on Internet Time (tab), then Change settings, and type their Raspberry Pi’s address into the box. Click Update now for effect.
Thanks & Updates
This will be a perpetually updating post as I fine-tune and discover new things to do.
Note: No consideration (except for great customer service) was given to me by Adafruit for writing this. I did win an unrelated prize a few days ago that I should dig into though (OHS bag of swag).
12/24/12```: Added information on calibrating Adafruit’s GPS module (including references) and updated offset in configuration. Clobbered the introduction and added more spelling errors/walls of text to confuse/clarify things a bit.
02/05/13```: Added a reminder to connect the proper line before working on the Adafruit GPS module.
03/03/13```: Thanks to both Sven Wunder and @davidmonro_ for reporting that pps-tools needs to be installed during a compile of NTP from source.
## Extra Information on NTP

* Selecting reliable time servers: [http://support.ntp.org/bin/view/Support/SelectingOffsiteNTPServers#Section_5.3.3.](http://support.ntp.org/bin/view/Support/SelectingOffsiteNTPServers#Section_5.3.3.)

This includes a discussion about how a proper NTP setup should look like (having three servers to sync time is a good idea).

* ntpq documentation: [http://doc.ntp.org/4.1.1/ntpq.htm](http://doc.ntp.org/4.1.1/ntpq.htm).

* RFC 5905 (NTP v4 standard, very detailed): [http://tools.ietf.org/html/rfc5905](http://tools.ietf.org/html/rfc5905)

## Notes & References

1. [http://en.wikipedia.org/wiki/Network_Time_Protocol#Clock_strata](http://en.wikipedia.org/wiki/Network_Time_Protocol#Clock_strata)
2. The kernel fork I used and modified is available [here](https://github.com/davidk/adafruit-raspberrypi-linux). Look under the `ppsgpio` branch. You can clone it or download the entire thing by clicking around.
3. [http://doc.ntp.org/4.2.6p5/confopt.html](http://doc.ntp.org/4.2.6p5/confopt.html)
4. [http://www.eecis.udel.edu/~mills/ntp/html/drivers/driver20.html](http://www.eecis.udel.edu/~mills/ntp/html/drivers/driver20.html)
5. Note that this disables select sentences, so if you'll be re-purposing your
Adafruit GPS unit in the future, you may use this command to reset it to its default sentences:
bash $ echo -e ‘$PMTK314,-1*04\r\n’ > /dev/ttyAMA0 ```
If that fails, removing the battery and unhooking the power for your unit will usually revert it to its old behavior.
cheers!