Tools for 3D Printing: What do I get?
A pocket level ensures things are reasonably level before further calibration and fine tuning
These are few of the things i’ve used/and bought over the past few months while owning a 3D printer. If you’re new to the 3D printing world (and making, in general), collecting and/or using some of these will make your life easier.
These are the basics, so you may be able to borrow these from a (friendly) maker and/or tinkerer.
Thread-locking fluid
In the first few months weeks of owning my 3D printer, I made the mistake of assembling my printer without thread-locking fluid. Of course, bolts and screws fell off during long prints causing incalculable amounts of wasted time and filament.
Thread locker (or the stuff by its popular brand name: Loctite) keeps a bolt from freeing itself (usually via vibration forces), while allowing it to be removed by hand if needed.
Adding loctite is best done during a printer build. If certain parts are constantly coming loose, working it in as needed will do too.
Part #: 91458A115 (McMaster-Carr, Loctite 243, Blue)
Stuff to make things move
For squeaks, metal on metal noises, or just for things that move and make contact, adding a few drops of lubricant is occasionally needed to keep things in good form.
Some printing guides prefer sprays (especially on vertical areas like Z-axis rods). For several months i’ve been using a liquid lubricant, which contains PTFE (without issue so far). I didn’t intend to use it for my printer, but it ended up working quite well.
Part #: 1155K33 (McMaster-Carr). You get a lot for about $5 (not including shipping of course).
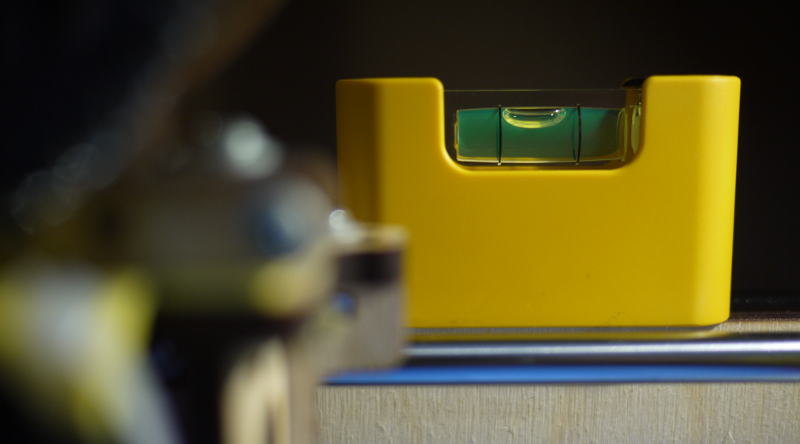
Pocket level
On my particular printer, there is the potential for a lot of things to go out of alignment (either due to stresses at rest, or operator error). A small level is great for getting things into a general ball park for further fine tuning.
The Stabila Pocket Level ($10) is magnetic (the magnetized area isn’t obvious, but it is on the bottom). It also has a very clear window for viewing the bubble, and is slightly more fluid than some of the other bubble levels I have on hand.
While it is a bit expensive for a smaller level (slightly larger levels like torpedo levels are well within or below its price), this is a pretty good quality level that seems like it will last.
It will also (unlike torpedo levels) fit into areas with very little clearance.
What does it look like? Scroll up a bit. :)
Part #: Stabila 11990 Pocket Level - (Amazon)
Cable/zip ties
If your printer looks anything like mine, nearly everything (including the pullies and even some of the linear bearings) are held together by these ties. And sometimes readjusting things means cutting those ties.
For a few bucks you can stop cursing while trying to find a replacement tie.
Part #: 7130K41 (McMaster-Carr). These are the smaller ‘micro’ zip ties, and come in a large enough pack to stave off regret at the amount of zip tie waste you’re bound to generate.
Long screwdriver/racheting driver
Who doesn’t have a screwdriver? (Answer: A person who needs one right now.)
A ratcheting driver makes a surprising difference on a printer.
I’ve been quite happy with a Stanley Ratcheting Screwdriver ($10). The shortened turn in ratchet mode is great when working in tight spaces (where it is hard/annoying to do “full” turns).
This particular driver comes with several extra bits hidden in the endcap and has the ability to become a normal/fixed screwdriver with a twist of the knob.
Normal screwdrivers are more than enough though, and this is really just optional.
*** Part #: Stanley 69-189 Ratcheting Multi-Bit Screwdriver - (Amazon)***
Other accessories
These are parts that I have no specific recommendation for, but once you have them you may wonder what you did without them!
Straight tweezers
At working temperatures, the extruder gets really hot. And print beds do as well. To save yourself from getting actual 3D printing battle scars, get a pair of tweezers to pluck out stray strands of filament.
During warm up, just use the tweezers to pluck at the extruder, or to scrape off a small starting failure/error from the bed that has failed to adhere.
It is likely that you wouldn’t want to use an ESD-style tweezer (they’re often colored black with a matte finish). Mostly this is because some of them have a lightly applied coating that scratches easily. Save the ESD tweezers for sensitive electronics work.
Flush cutters
Cutting filament is kind of an afterthought, but it needs to be done (usually when loading and unloading new/used filament). A pair of throwaway flush cutters will make doing so quick and easy.
It probably isn’t a good idea to use new or flush cutters you love. Certain plastics like PLA are fairly hard, which may cause faster wear and tear on cutters. Then again, decent cutters can be had for a good price nowadays (Xcelite cutters are pretty decent! Mouser Part #: 578-175M).
Detachable/Reusable spool
Using filament freestyle without any sort of management is a recipe for disaster over time. Many of my early troubles were due to buying spool-less, (but wound filament) and trying to wing it without a spool.
If I went to sleep, got a drink or otherwise looked away for a bit, the filament would somehow find a way to tangle, feed incorrectly, or do nasty things like snap (after tensing up due to tangling).
After resorting to hacks, (like turning the filament bag itself into a spool holder), I got kind of fed up and decided to just get a reusable spool.
A decent one for small quantities (1 lb, or 454 grams for everyone else), consists of a spool that can have the side detached (usually via screws) and filament loaded in.
I’ve found that the filament doesn’t necessarily have to be completely flush with the hub for small quantities (perhaps 1⁄2 a pound or less), just ‘enclosed’ by the spool walls.
Some good features to look out for are pre-drilled holes to put the filament ends into, and a standard diameter/width size (if you’ll be using multiple spools with a particular spool feeding system/holder).
For most spool setups, they should be mounted on some sort of holder where the filament can be pulled into the extruder smoothly (and consistently).
Spool holder
There are plenty of examples on Thingiverse of spool holders. Some can be purchased for $8 and some can be made out of PVC pipe. Don’t forgo this for too long, as it is a pretty good addition to your printing kit if it isn’t already built-in to your printer.
Tongue-and-Groove Pliers
Otherwise known as Channellocks (which is also the name of the company that created them), these pliers are pretty great to have around, either to remove a print with brute force (if necessary, and if your print allows for it), or for tightening things.
If you don’t have these already, they can be cheaply had at many stores (McMaster-Carr also sells them), and are useful for other things around your home as well.
Calipers
This is usually required by every “Welcome to your brand new 3D printer!” guide. You’ll need one to calibrate things like extrusion amounts (when loading new filament) and to bring physical objects into CAD for printing.
Be sure to do extra research on the different types of calipers out there, as quality can vary a lot between types (veiner vs digital) and brands (Mitutoyo vs dollar store type).
Blue Painter’s Tape
A spool of something like 1⁄4” 3M Blue Painters’ Tape will work very well as a surface for your PLA print to adhere to (as long as the first few layers are pressed down into the tape proper). The larger width also makes resurfacing fairly easy.
(ABS users will want to look into Kapton/Polyimide tape or squares)
Best of luck in your printing adventures!
cheers
Errata / Changes
05/09/13: Clarifications and basic fixes